Ubuntu命令行安装nvidia显卡驱动
2018-01-25
执行下面的命令:
sudo add-apt-repository ppa:graphics-drivers/ppa
sudo apt update
sudo apt-get install nvidia-384
使用nvidia-smi查看GPU的状态。
比如本文使用的GPU:
Thu Jan 25 21:40:28 2018
+-----------------------------------------------------------------------------+
| NVIDIA-SMI 387.34                 Driver Version: 387.34                    |
|-------------------------------+----------------------+----------------------+
| GPU  Name        Persistence-M| Bus-Id        Disp.A | Volatile Uncorr. ECC |
| Fan  Temp  Perf  Pwr:Usage/Cap|         Memory-Usage | GPU-Util  Compute M. |
|===============================+======================+======================|
|   0  GeForce GTX 108...  Off  | 00000000:02:00.0 Off |                  N/A |
| 23%   40C    P0    54W / 250W |      0MiB / 11171MiB |      1%      Default |
+-------------------------------+----------------------+----------------------+

+-----------------------------------------------------------------------------+
| Processes:                                                       GPU Memory |
|  GPU       PID   Type   Process name                             Usage      |
|=============================================================================|
|  No running processes found                                                 |
+-----------------------------------------------------------------------------+
阅读全文 »
Ubuntu命令行下设置IP
2018-01-25
本文介绍通过命令行设置IP、网关的方法。
首先通过ifconfig命令查看系统的网卡。
比如本文使用的网卡是eth1。
然后通过下面的命令设置IP和网关。
sudo ifconfig eth0 172.16.1.226 netmask 255.255.255.0
sudo route add default gw 172.16.1.1 eth0
重启网络服务:
sudo /etc/init.d/networking restart
查看路由情况:
route -n
阅读全文 »
Ubuntu下安装dlib
2018-01-25
本文介绍dlib在ubuntu系统中的安装方法。
在安装之前首先要确定python3已经安装。
安装依赖包和下载代码:
sudo apt-get install libboost-all-dev
git clone https://github.com/davisking/dlib.git
编译C++ so库
cd dlib
mkdir build
cd build
cmake .. -DDLIB_USE_CUDA=0 -DUSE_AVX_INSTRUCTIONS=1
cmake --build .
安装python模块
cd ..
python3 setup.py install --yes USE_AVX_INSTRUCTIONS --no DLIB_USE_CUDA
完毕~
阅读全文 »
Ubuntu下Virtualbox添加usb支持
2018-01-25
在宿主机上安装了一个免驱摄像头,但是想要在虚拟机中使用的话应该怎么办呢?
方法很简单:
首先下载打开virtualbox的下载地址,找到支持插件VirtualBox Extension Pack下载链接 。
下载到本地之后双击即可。注意要先将已经打开的虚拟机关闭。
安装成功之后,打开虚拟机,选择Device–>Webcams–>usb2.0 camera,即可在虚拟机中使用
在虚拟机命令行中执行ls /dev/vide0可以看到输出/dev/video0即表示安装成功。
如果想验证摄像头是否能正常使用可以安装camorama:sudo apt-get install camorama。然后命令行执行camorama即可~
阅读全文 »
Ubuntu下的网络监控
2018-01-10
Nethogs 是一个终端下的网络流量监控工具,它的特别之处在于可以显示每个进程的带宽占用情况,这样可以更直观获取网络使用情况。
使用方法:
sudo apt-get install nethogs #安装工具
sudo nethogs eth0 #或者eth1 ifconfig查看系统的网卡

阅读全文 »
解决RuntimeError: input is not contiguous问题
2018-01-09
出现了这个问题是因为tensor在内存中地址不是连续的,因而需要调用.contiguous()方法使得变为连续.
用法:
torch.randn(2,2).contiguous()
阅读全文 »
3.RNN模型
2018-01-08
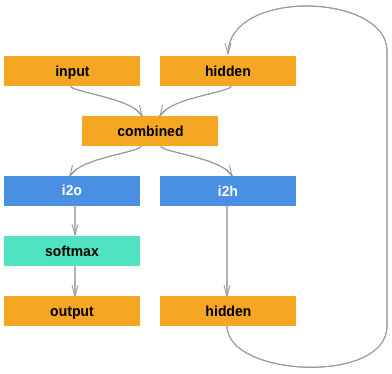
本文的目标是实现Elman RNN模型。
Elman RNN模型
模型结构用数学公式表示很简单:
\(h_t=\tanh(w_{ih}*x_t+b_{ih}+w_{hh}*h_{(t-1)}+b_hh)\)

$h_{(t-1)}$表示$t-1$时刻隐层的输出,$x_t$表示$t$时刻的输入,i表示第i层。RNN使用tanh或ReLU作为激活函数。
模型的结构如下图所示:

Pytorch中的RNN模型
Pytorch中RNN模型的API为:
class torch.nn.RNN(*args, **kwargs)
1.构造函数参数说明:
| 参数 | 说明 |
|---|---|
| input_size | 输入层输入的特征个数 |
| hidden_size | 隐层输入的特征个数 |
| num_layers | 网络的层数 |
| nonlinearity | 非线性激活函数:‘tanh’或’relu’. 默认: ‘tanh’ |
| bias | False,表示偏置值为0, 默认: True |
| batch_first | True, 表示输入、输出中batch放在参数第一个:(batch, seq, feature) |
| dropout | 非0表示引入Drop层,最后一层除外。 |
| bidirectional | True, 表示双向RNN. 默认: False |
2.输入参数说明:
- input:输入的格式(seq_len, batch, input_size)
- $h_0$:训练开始时隐层的初始状态:$h_0 (num_layers * num_directions, batch, hidden_size)$
batch表示有几个长度为seq_len的序列。
3.输出参数说明:
- output:输出的格式:$output(seq_len, batch, hidden_size* num_directions)$
- $h_n$:n时刻隐层的输出:$h_n (num_layers * num_directions, batch, hidden_size)$
4.中间变量
| 参数 | 说明 |
|---|---|
| weight_ih_l[k] | 模型学习到第k个输入层到隐层的参数,大小为:(input_size x hidden_size) |
| weight_hh_l[k] | 模型学习到第k个隐层到隐层的参数,大小为:(hidden_size x hidden_size) |
| bias_ih_l[k] | 模型学习到第k个输入层到隐层的偏置参数,大小为: (hidden_size) |
| bias_hh_l[k] | 模型学习到第k个隐层到隐层的偏置参数,大小为: (hidden_size) |
5.实例
rnn = nn.RNN(10, 20, 2)
input = Variable(torch.randn(5, 3, 10))
h0 = Variable(torch.randn(2, 3, 20))
output, hn = rnn(input, h0)
阅读全文 »
如何开启jupyter的远程服务
2018-01-08
本文介绍如何开放jupyter的远程功能。
设置jupyter notebook密码:
jupyter notebook password
可以看到如下输出:
Enter password:
Verify password:
[NotebookPasswordApp] Wrote hashed password to /home/yyddl/.jupyter/jupyter_notebook_config.json
修改配置文件
执行:
cat ~/.jupyter/jupyter_notebook_config.json
#上面的命令会输出经过hash的密码,下面的步骤会用到。

jupyter notebook --generate-config

vim ~/.jupyter/jupyter_notebook_config.py
修改:
## The IP address the notebook server will listen on.
c.NotebookApp.ip = '0.0.0.0'

#  The string should be of the form type:salt:hashed-password.
c.NotebookApp.password = 'sha1:3573e878e007:ebebac2259023ba.....'
到这里就完成了基本的配置了。
之后通过:
jupyter notebook
打开浏览器界面,输入密码即可编码了~